Please note that this post was written when I first got my hands on the SDK and some things may have changed since then.
So, you just got your hands on the pebble SDK and are looking to write yourself a watch face? This post will introduce the creation of a watch face from the prototyping stage to packaging it up and running it on your device. The watch face I will be using for this tutorial is the “Times Square” watch face - the first one I wrote the day I got my hands. It is based off of the Pimp - Pimpin Ain’t Easy which I used as my main watch for about 5 or 6 years until I lost it this year. :( The watchface took about 2 hours to create from installing the SDK to getting it on my wrist.
At the time of writing, there is currently no emulator for pebble. This makes writing the application with the SDK a case of; writing some code, compiling it, starting your web server, downloading it on your pebble, checking it out, repeat. This is a fairly slow process which becomes tedious when you are checking if something should be one pixel higher or lower. For this reason, I wrote a quick prototype of my watch in JavaScript. The reason for using JavaScript is using canvas, you can quickly simulate the type of functions available in the pebble API.
The HTML structure of my page looks fairly standard, the pebble runs at a resolution of 144x168 and defaults to a black background.
/* These will be converted to CONSTANTS in the C code, so keeping them uppercase and outside of the main block makes it easiest to port */varCELL_WIDTH=8;varCELL_HEIGHT=8;varCELL_PADDING_TOP=5;varCELL_PADDING_RIGHT=5;varLEFT_OFFSET=33;varTOP_OFFSET=10;/* This function will return a GRect in the C implementation which provides the location of on of the squares that is used to indicate the time. */functioncell_location(row,col){return[(row*(CELL_WIDTH+CELL_PADDING_RIGHT))+LEFT_OFFSET,(col*(CELL_HEIGHT+CELL_PADDING_TOP))+TOP_OFFSET,CELL_WIDTH,CELL_HEIGHT];}/* Get the canvas so we can draw to it */varimg=document.getElementById('canvas').getContext('2d');/* This will roughly translate to how we get time in the C version the time doesn't need to be the current time as we know how this should look */vart={tm_hour:10,tm_min:57}/* This is the main function that is called at the specified interval - in our case this will be called once every minute on the watch. */functiondisplay_layer_update_callback(){/* Empty the canvas */img.clearRect(0,0,144,168);img.fillStyle="#FFFFFF";varminutes=0;varcol,row,height;/* These loops are responsible for determining which cells to display. It should be fairly trivial to loop through. */for(col=0;col<12;col++){for(row=0;row<6;row++){height=col;/* Hour mode */if(row==0){if(12-col>t.tm_hour){continue;}}else{if(minutes++<t.tm_min){height=(11-col);}else{continue;}}vara=cell_location(row,height);img.fillRect(a[0],a[1],a[2],a[3]);}}}/* Not quite all the correct logic, but it covers the minutes ticking over which is enough for our needs */functionhandle_minute_tick(){t.tm_min++;if(t.tm_min==60){t.tm_min=0;t.tm_hour++;}display_layer_update_callback();}/* Let's make sure this gets triggered straight away */handle_minute_tick();/* We will call the minute function every second to prevent waiting */setInterval(handle_minute_tick,1000);
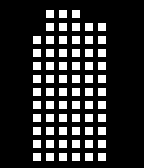
The above code creates the following:
Porting to C
You are now ready to port this code to C. This is a fairly straight forward port. First off you will want to create your watch face using the template provided.
This is all you need, you can get this on your pebble now, but it won’t be that useful to you, it won’t event display the time! Here is the full source code for the watch face. The comments explain what is happening.
/* These are the includes required for the pebble os */#include "pebble_os.h"#include "pebble_app.h"#include "pebble_fonts.h"/* Set up your application. We have left the icon empty for now but will cover how to do that later. Here is the method signature: define PBL_APP_INFO(name, company, version, icon_resource_id, flags) */PBL_APP_INFO("Times Square","Gazler",1,INVALID_RESOURCE,APP_INFO_WATCH_FACE);Windowwindow;Layerdisplay_layer;/* These are the variables we defined in our JavaScript earlier. This will save us trying to work out where the cells should go. */#define CELL_WIDTH 8#define CELL_HEIGHT 8#define CELL_PADDING_RIGHT 5#define CELL_PADDING_TOP 5#define LEFT_OFFSET 33#define TOP_OFFSET 10/* This is a port of the same function from the JS - it returns a GRect which is required to draw a rectangle on the display_layer. */GRectcell_location(introw,intcol){returnGRect((row*(CELL_WIDTH+CELL_PADDING_RIGHT))+LEFT_OFFSET,(col*(CELL_HEIGHT+CELL_PADDING_TOP))+TOP_OFFSET,CELL_WIDTH,CELL_HEIGHT);}/* This is a port of the JS function. */voiddisplay_layer_update_callback(Layer*me,GContext*ctx){/* We are not using the layer, this will prevent compile errors */(void)me;/* This is the object where we will get our time, it is the equivalent of the t variable in our JS version */PblTmt;/* Get the current time from our time object */get_time(&t);graphics_context_set_fill_color(ctx,GColorWhite);intminutes=0;inthour=t.tm_hour;/* convert 24 hours to 12 hours */if(hour>12){hour=hour-12;}introw,col,height;for(col=0;col<12;col++){for(row=0;row<6;row++){height=col;/* Hour mode */if(row==0){if(12-col>hour){continue;}}else{if(minutes++<t.tm_min){height=(11-col);}else{continue;}}/* This is very similar to the fillRect function in our JS version. Here is the method signature of graphics_fill_rect void graphics_fill_rect(GContext *ctx, GRect rect, uint8_t corner_radius, GCornerMask corner_mask); */graphics_fill_rect(ctx,cell_location(j,height),0,GCornerNone);}}}voidhandle_minute_tick(AppContextRefctx,PebbleTickEvent*t){/* Prevent the compiler earnings as in the display callback */(void)t;(void)ctx;/* Tell the application to rerender the layer */layer_mark_dirty(&display_layer);}voidhandle_init(AppContextRefctx){/* You know the drill by know */(void)ctx;window_init(&window,"Times Square");window_stack_push(&window,true);window_set_background_color(&window,GColorBlack);/* Init the layer for the display */layer_init(&display_layer,window.layer.frame);display_layer.update_proc=&display_layer_update_callback;layer_add_child(&window.layer,&display_layer);}voidpbl_main(void*params){PebbleAppHandlershandlers={.init_handler=&handle_init,/* We want our watch face to update every minute instead of every second */.tick_info={.tick_handler=&handle_minute_tick,.tick_units=MINUTE_UNIT}};app_event_loop(params,&handlers);}
Getting it running
Run the following commands to compile the watchface for use on pebble:
./waf clean build && python -m SimpleHTTPServer
Then visit the following url on your phone that is linked to your pebble:
http://<YOUR_IP_ADDRESS>:8000
Download the .pbw file and you are good to go.
Adding an icon
The final thing to do is to add the icon. Create your icon as a 24x28 png file, using any filename you like. Create a folder in resources/src called images and save your icon in there. Then update the resource_map.json file in the same directory to the following.